Quantcast
Channel:  The Dentrix Office Manager Blog
Viewing all 313 articles
Browse latest View live

Expand your Medical Alert Notes with G6 and Questionnaries

$
0
0

When I first saw all the new and exciting features with Dentrix G6, I was eager to learn how to apply them into my everyday workflow. There is a new feature that enhances something I have been teaching for a long time and that is the health history update. If you have been reading my blog for a while, you know that I love using the Questionnaire Module for updating the health history update because it is a secure location, keeps a chronological history, and is super easy to use.

Watch my video to learn about this cool new feature.


If you are new to Questionnaires, please read these articles to learn more.

Creating a form - CLICK HERE
New Patient Forms - CLICK HERE
Documentation - CLICK HERE
 

Medical Billing . . . the new shiny toy

$
0
0

Medical billing is definitely the new shiny toy that is getting lots of attention lately. Each week, I receive several e-mails from offices asking if they should or shouldn’t use medical billing in their practices. The answer is … well … it depends. It depends on whether you have medical necessity. You can’t just bill medical for an oral appliance because it is covered under a patient’s medical plan. You must have medical necessity and proper documentation.
There are many considerations when deciding to take on medical billing. The office I worked at for 18 years performed a lot of neuromuscular, head, neck, and facial pain treatment and medical billing was an integral part of our billing process. I think medical billing can be a huge value-added service. However, I want you to go into it with eyes wide open.
  • You must have a medical diagnosis – If the patient is being referred to you for an oral appliance from his or her physician for sleep apnea or TMJ, usually the physician can provide you with the diagnosis code and any clinical documentation that will be necessary for the claim. However, if the patient is not being referred, then your doctor will need to provide the diagnosis code for claims processing.
  • Medical is billed on a different claim form – If you are going to process the claims for your patients, you will need to send them electronically on a HCFA1500 claim form. Medical insurance plans will no longer accept paper claims from the practice, but you can give patients a paper HCFA1500 claim form to submit to their insurance if you choose.
  • Be prepared for denial, denial, and more denials – Medical is worse than dental when it comes to stalling payment. You may want to consider having the patient pre-pay for treatment, then reimbursing him or her when the medical insurance pays.

If I haven’t scared you off yet and want to pursue medical billing in your office, check out an article I wrote last year on getting started with the setup in your Dentrix software by CLICKING HERE. E-mail me directly if you want one-on-one training for your team to learn medical billing in Dentrix.

Stop giving the insurance companies so much power

$
0
0

Will whoever gave the insurance companies the power to do whatever they want please stand? Oh yeah … we did. We have given and continue to give them power when we don’t have proper documentation to justify our treatment plan or confirmation showing that our claims have been received. If we don’t manage our systems properly, we have to do what they tell us to do because we can’t prove anything.
The easiest way to have some leverage with your insurance companies when it comes to claims processing is to use Dentrix eClaims. The claims reports and support you get will give you a leg up when you have to follow up on an unpaid claim. When you use Dentrix eClaims, you receive a lot of reports. When I am training out in the field, I ask the team, “What do you do with these reports?” The most common answer is “Nothing” or “I don’t know”. These reports give you the information you need to be in charge of your claims and attachments, but you need to know what to look for.
The two most important eTrans reports for you to look for are the Payer/Clearinghouse Report and the Attachment Status Report.

Payer/Clearinghouse Report – You will receive this report about 24-48 hours after a claim is sent out and it contains some very important information. This report will give you the INSURANCE REFERENCE NUMBER also called a DC#. The DC# you are looking for is one that has the source as the insurance carrier. This is the only number the insurance company will be able to use to track your claim. My recommendation would be to copy this DC# into the claim status note so you have it readily available if you need it, then you can shred the rest of this report.

Attachment Status Report – This report will give you the NEA number assigned to your attachment within 6-24 hours after you send your claim. If the insurance company states they did not receive your X-ray or perio chart, you can use the NEA number to prove the attachment was received and they should be able to track it. As stated above with the DC#, my recommendation would be to copy this NEA number into the Claim Status Notes on the claim so if you need it, you don’t have to track down your reports.

Don’t give the insurance companies the power to manipulate the situation. If they say they do not have the claim and you have the DC#, do not resend another claim. Ask to speak to a supervisor or call the Dentrix eClaims support team and they will help facilitate the situation.

Another great resource for you to use is the Insurance Manager with eCentral and have the reports archived for you.

With all the details to remember we sometimes forget things . . .

$
0
0


It’s the little things that make a huge difference in the daily lives of the dental team. There are so many details to remember in order to make sure your patients are well taken care of. One of those details you don’t want to forget is giving patients post-op instructions after their surgery or complicated dental procedure. When you are managing a busy schedule, making sure the instruments get into the sterilizer, and turning your room over for the next patient, sometimes things can get missed. How can you systematize your post-op instructions? Let me show you. J

You can add a doctor’s recommendation note to print out on the patient walkout statement or set up a separate post-op letter to print out in addition to your patient walkout statement. This can be set up to print automatically on the patient’s receipt, depending on what procedure code has been posted complete.

To set this up, go to the Office Manager > Maintenance > Practice Setup > Procedure code setup. Select the code you want to attach the post-op instructions to and click Edit. In my example, I have selected the D3310 Root Canal Therapy. In the lower left of the code edit window, there is a button Edit Note. Click on this. In the lower window where it says Recommendation Note, type your post-op instructions (or copy and paste from another document), then check “Print Note on Walkout.” Repeat this process for all your surgical and complicated procedures.

 
If your office wants a full letter to be printed out with the patient’s receipt, you can set up a letter to attach to the walkout statement and it will print as a separate piece of paper. You will notice directly under the Print Note on Walkout there is a Recommendation Documents >>. If you click on the >>, it will open up the same document folder you would use for your Quick Letters or Letter Merge.

The final step is to default this not to print on your walkout statements from the ledger. From the Ledger, click on the Print tab at the top of the toolbar, click on Walkout, then make sure there is a check mark in the Print Doctor’s Recommendations and check Set as Default. Now you have systematized your post-op instructions for every procedure code to automatically print as part of the patient’s receipt instead of sifting through folders of pre-printed forms.

Inactive, Archived, Non-Patient . . . . what do I choose?

$
0
0

I wrote an article titled “At some point we need to let thepatient go,” but does this mean the patient is inactive or should we archive him or her? What is the difference between a Non-Patient, Inactive, and Archived patient? Does your practice have its own definition or do you choose to just ignore it?

These questions come up a lot when I am working with dental practices on cleaning up their systems and putting effective systems in place for managing their active patient base. It is important to know what your active patient base is so you are not reaching out to patients who have either left the practice or died. Having reports and patient lists is important when you start following up with unscheduled treatment and overdue recare.

I would like to share with you not only the definitions of each patient status, but what my recommendation is for each.

·        Non-Patient – This is a person who is either an insurance holder or a guarantor on a family account. This is not a person who comes to your office for dental care. Now this person could also have a patient account if he or she is only an insurance holder for another patient in your practice. For example, if mom is a patient with her two children and dad is the insurance subscriber, then mom would be the guarantor and dad would be a non-patient on the account.

·        Inactive – This is where there it gets a little “gray.” If you mark a patient as inactive, he or she will still show up in all search results and you can still send out letters and generate reports.  My opinion is that if you have exhausted all your resources by calling, sending letters, and emailing patients and they are not responding to you, then you should mark them as inactive. What inactive will do is at least remove them from the Continuing Care lists and you can unselect them from other management reports.

·        Archived – If you archive a patient, then he or she is removed from all search results, removed from all Continuing Care, it erases all insurance information, and deletes any future appointments in the schedule. My opinion is that if patients have told you they are leaving or died, then archive them. If the patient who has left the practice decides to return, you can bring the account back to active status and re-enter the insurance and continuing care information.

Having a clean, accurate system helps with many things like patient count, unscheduled treatment numbers, and setting goals. I hope you will take some time and clean up your patient status and create systems in your practice using the definition of each status.

Business of Dentistry . . . why it's my favorite conference of the year

$
0
0
It’s that time of year. It’s time to get your doctor and your team registered for the Business of Dentistry Conference. As you have heard me talk about before, I have never missed a conference and I am going to give you 5 reasons you and your team should not miss it either. This year's conference is being held Oct 7th - 10th in sunny Florida.

 
  1. You will be repeating the words “I didn’t know Dentrix could do that! I can’t believe how we are under-utilizing our practice management software.” Even if you have been using Dentrix for over 10 years, I can guarantee you will learn things that you didn’t know existed. Last year, I taught the advanced Billing and Collections class and my class was filled with doctors excited to learn how the software could help their practices meet production goals. It was eye-opening.
  2. There is something to learn for every member of your team. Especially the dentist!  This year the Business of Dentistry is offering more clinical technique and technology courses than ever before.   The Dentrix courses have a skill level from entry level to advanced so the attendees can choose the level that best fits their knowledge of the software. This conference attracts some of the most sought-after consultants and they tailor their presentations to fit into the Dentrix agenda so you not only get amazing practice management educational material but you also get tips on how to implement it into your practice management software.  Check out the course listing by CLICKING HERE.
  3. Don’t miss the Learning Lab. This is my favorite part of the Business of Dentistry Conference. This is where you get to bring your questions and sit down with a knowledgeable support tech and get one-on-one help. If you are having issues with Dentrix, eServices, Easy Dental, or Enterprise, bring it to the Learning Lab. Here’s a tip: Take screen shots and print them out so you can show the team your issue (make sure you black out any patient information).
  4. Learn aboutthird-party software that integrates with your Dentrix software. The vendors pour out into the hallways just waiting to tell you how their product, along with your Dentrix software, can help your practice more profitable, secure, or productive. Since Dentrix G5 opened up the Marketplace, there are many third-party companies that enhance your software in so many ways. I will have a booth at this year's conference so come by say Hi and check out what I have to offer you and your team. 
  5. Finally . . . have some fun and enjoy spending time with your team! This year’s conference is being held at the amazing Gaylord Palms Resort and Convention Center in sunny Kissimmee, Florida.  Henry Schein always brings the fun to this conference. I can remember bowling parties and dance parties that were off the charts. I can’t wait to see what this year has to offer.

Why now is the perfect time to examine your fees

$
0
0

My good friend (and insurance editor for Dental Products Report) Teresa Duncan recently wrote an article about how now is the perfect time to reevaluate your office fees. Teresa says that many practices wait until the end of the year, but if your practice is anything like the norm, the end of the year gets pretty busy. CLICK HERE to read Teresa’s article on fee updates. My blog today wants to piggyback on Teresa’s article and show you how to implement this task in your Dentrix software.

The process of updating your fees is a pretty simple task that can be accomplished with a couple of clicks. Go to the Office Manager > Maintenance > Practice Setup > Fee Schedule Setup (if you are on earlier versions of Dentrix, it might say Auto Fee Schedule Changes). You will get a window that looks like this. If you want to update your fees using a percentage or a dollar amount, click on the Auto Changes button and your fees will automatically be increased by the amount you set, then you will have an opportunity to look at each procedure code individually and then click OK to accept the changes.

If you want to take a more complex approach and change each procedure fee individually or if you want to copy one fee schedule to another, you can click on the View/Edit button and open a window that will allow you to update fees one by one or copy fees from another fee schedule. If you are updating a PPO fee schedule from a list provided to you by the insurance company, this is probably the method of choice for you.

Once you have updated your fee schedule, remember that any existing treatment plans still contain the old fees. With a new feature in Dentrix G5.2, you have a new feature where you can update all your treatment plan fees with the click of a button. Going back to my first image above, you will notice there is a Treatment Plan button. If you click on this, you can update all the fees in the existing treatment plans from here. If you have not upgraded to Dentrix G5.2, you can still update your treatment plan fees by opening the Treatment Planner.

Here are some other articles I have written on this topic if you want to continue reading about fees.
 

Protect your livelihood and your computers from viruses

$
0
0
If you are like me and read up on the latest news in the dental industry and keep up on breaking stories then you know that many dental practices have been violated recently by the Crypticwall or the Crypticlocker virus.  This virus can be devastating to the practice and embarrassing to you and your team.  My friend and Dentrix Product Manager, Brad Royer, wrote a great response to this topic in the Dental Town forum and I have his permission to share it with all of you.

These viruses do not just hold Dentrix for ransom, they hold your entire computer and other systems on the network ransom.  They are known as ransomware.  The most widely known example from a few years ago was called cryptolocker (this particular version is almost eradicated); however, there have been many other copy cats and other versions that have since been created.

Please see the following information on ways to prevent your office from being affected by this malware.


Security Tips for Small Businesses Regarding Internet and Email Usage

The following information provides tips for small businesses to follow in order to help avoid potential data compromise due to cyber threats from the internet while browsing the web or using email.

Email spam or junk mail is usually unsolicited email that is sent to a large number of recipients. These emails are usually irrelevant or inappropriate and may contain malware or viruses that can infect your computer. And in some cases, they could infect an entire network of computers. All one has to do is open up an unfamiliar or suspicious email and a virus can then immediately load on your computer.

The same goes for visiting certain web sites that contain malware or viruses. Simply visiting a popular social media site and then clicking an advertisement could result in a virus being installed on your computer. Spam, junk mail, viruses, and malware could lead to data loss, data breach, damage to systems, and high replacement and repair expenses. However, most of these threats can be avoided by educating your staff and implementing some basic protocols.

Security Tips

  • Do not share your business email accounts except for with customers, patients, and colleagues.
    • In most cases, in order to receive malicious emails, spammers first need to know your email address. Therefore, it is recommended that your business email addresses not be shared with anyone except your patients, your customers, and your colleagues.
    • Sometimes it is necessary to use your business email to sign on to a web site. Be sure that if you use your business email address on a web site, only use it on a legitimate web site that you are familiar with. And make sure that this usage is for business purposes only. Unfortunately, even legitimate web sites will often share your email address with third-parties. However, the more you can reduce the exposure of your business email addresses to the web, the safer your email will be.
  • Do not post your business email account on the public internet such as posting on your business web site or on forums.
    • Harvesting bots are special software designed to obtain email addresses from public data on the web. Once emails are harvested, the emails are then added to lists for sending spam emails and other threats. In order to help avoid having your business email address harvested it is a good idea to not post your business email address on your company web site or on a web forum for the public to see. Also, make sure that your email address does not show up in your signature on a forum or as a link within a guest book. If the public can see your email address, then it is likely that a harvesting bot can see it also.
    • Make sure that your company web site has some sort of security method in place to hide your email from harvesting bots while allowing your web site visitors to communicate with you.
  • Do not use your business email address to sign up for promotions, drawings, or other marketing gimmicks.
    • Sharing your business email to sign up for anything free or for any special promotion is likely a method for a spammer to collect email addresses. Some of the signup emails or signup pages can even contain malware or viruses that immediately load on your computer.
  • Do not open unfamiliar or suspicious emails; delete them.
    • When checking email, do not click on unfamiliar or suspicious emails or attachments. Instead, immediately delete them. Some suspicious emails when clicked can add your email address to a list, or even worse, install malware or a virus.
    • Also, be careful with unsubscribe links in certain emails. Although many unsubscribe links are legitimate, some unsubscribe links within suspicious or unfamiliar emails could contain links to further threats.
  • Microsoft Exchange users should implement SPAM Firewall services.
    • If you host your own Microsoft Exchange server, you need to implement a Spam Firewall service such as Barracuda. This type of service will help reduce spam emails arriving to your inbox.
  • Web based email users, only use legitimate email services rated high for security.
    • If you use web based email for your business, make sure to only use a reputable service such as Outlook.com or Gmail that contain built in security measures to help prevent spam and viruses.
  • Restrict email usage.
    • Email usage should be for business purposes only and should be conducted by approved and secure email methods. Limit email usage to only select employees who will be responsible for following the proper protocols. Personal email on business systems should not be allowed.
  • Be suspicious of email attachments.
    • Before opening an email attachment verify that you recognize the sender, the name of the attachment, and the body of the email. If anything seems out of place do not open the attachment. Delete.
  • Restrict web surfing.
    • Minimize the number of users in the office that are allowed to surf the internet. This can be accomplished by implementing and enforcing rules for usage. Only surf the web for business purposes while only visiting legitimate web sites.
    • Systems that do not need web browsing can have the web browsing disabled either through the computer settings or by changing the settings within the firewall.
    • Perhaps implement web filtering services. These services can allow some web browsing to occur while filtering potentially dangerous sites or sites that waste time and productivity of employees.
    • The more systems with a web browser that is filtered or disabled, the safer the network will be.
    • Personal web browsing by employees should not be allowed on business computers. Although visiting social media sites and other personal web sites may be common, this is the leading cause for businesses acquiring viruses on the network. Make it the protocol that employees must web surf on their own personal devices such as phones or tablets.
  • Implement email encryption.
    • Before sending an email to a customer, patient, or colleague, consider encrypting the email so that it cannot be read or captured by a hacker while in transit. There are many third-party services that offer encryption.
    • Also, products such as Adobe Acrobat allow one to encrypt a single document at a time that is password protected. The document can then be attached to an email and then sent. The recipient only needs to know a password to unlock the encryption and then view the documents once received. This is a basic and inexpensive method for encryption.
  • Get rid of old email accounts if they receive too much spam and open new email accounts.
    • If your business is using an old email account that receives excessive SPAM and junk mail, maybe it is time to retire the old email address and create a new one. Be sure to not share the new email address with anyone except customers, patients, colleagues, or legitimate web sites for business purposes only. This may require updating or changing business cards, flyers, or your company web site.
  • Do not allow employees to check personal email on business computers.
    • So far as personal email, there is a very simple protocol for employees to follow. Do not allow personal email to be checked on business computers. Employees should use their personal devices such as phones or personal tablets to check personal email.
  • Do not allow employees to connect their personal devices such as phones or tablets to the business network.
    • Make sure that employees are not connecting their personal devices to the business network. The only exception would be is if you have a secure firewall in place with a separate guest network. The guest network must be firewalled from the business network, never allowing communication between the two.
    • If you do not have this sort of secure and separate guest network, then do not allow personal devices to connect to the business network.
  • Run updates on all systems on a regular basis.
    • Run Windows updates on a regular basis. Be sure to run these updates during business downtime and be prepared for the updates to take quite a bit of time to install. There could possibly be multiple reboots involved. Once completed, be sure to test all systems, test all database software, and test healthcare devices to make sure they are in good working condition before the next business day. Windows updates cannot protect against all possible attacks, but they can help to make your systems more secure.
  • Make sure you have up-to-date antivirus software on all systems.
    • This includes all workstations and servers. Antivirus needs to be active and up-to-date. Although, antivirus cannot protect against all possible attacks, it can help to keep your network safer by addressing possible viruses and malware.
  • Be sure to always have a current backup of your data and an old backup of your data.
    • Each backup should be on separate, secure media. You should have multiple backup sets that represent multiple restore dates. Some backup sets should be new and some should be older. That way you will have more choices of dates to restore from. For example, one backup from yesterday, another backup from two days ago, another backup from three days ago, and a fourth backup from two weeks ago, etcetera. The more backup sets that are available to choose from in a restore situation the better the odds are of restoring the system to the best possible state in a disaster recovery scenario. Multiple backup media and multiple backup methods are encouraged.
Brad Royer
Dentrix Product Manager
Henry Schein Practice Solutions


Your hygiene department is the lifeblood of your practice

$
0
0

Do you sometimes feel a little out of touch with your recare patients? Do you think sometimes there are patients you haven’t seen for a while and you wonder where they are? Are you ready to take your hygiene department to the next level?

Your hygiene department is the lifeblood of the practice. If you don’t have a reliable system for managing when your patients are due for their regular checkups, then your office could be spinning its wheels when it comes to working from accurate lists. If set up properly, the Dentrix Continuing Care system will run like a well-oiled machine. Let’s look at the features that will help you generate accurate lists, give you some custom filter options, and streamline the process.

First, decide what continuing care types you want to track and make sure they are linked to the correct procedure code. Remember, you can only have one continuing care type per procedure code. Some examples might be:
  • PROPHY linked to D1110 and D1120
  • PERIO linked to D4910 and D4341
  • RECARE linked to D4910, D1110, and D1120

CLICK HERE for more information on linking up your continuing care types to procedure codes.

The next piece you want to think about is how you might filter your lists and what kind of customization you can do within the Dentrix Continuing Care system. You are dealing with different biological systems and personalities, so Sally might need to come in every 3 months for her prophy and want to be scheduled only with HYG1 and Michael might need to come in every 6 months for his prophy but want to see HYG4. How do you keep track of all these personalized settings? Its super easy!


On the Family File, double click on the Continuing Care box > highlight the Prophy and click edit. This will open a new window. Here you can edit the patient interval and select a specific hygienist of choice.

After you have customized the patient’s Continuing Care screen, you and your team can now generate customized lists with the push of a button. You can create a list for HYG1 patients and a different list for HGY4 patients. This can help your hygienists and front office team fill openings faster and feel confident your lists are accurate and up to date. CLICK HEREfor more information on keeping your hygiene schedule full (make sure to read all three articles).

How can you prepare for the ICD-10 deadline?

$
0
0

The countdown to October 1, 2015 continues as we all wait to see if the implementation of ICD-10 really happens or not. Many of you have been using the ICD-9 code sets when billing medical insurance for procedures like TMJ, sleep apnea, and trauma. However, we are now seeing the use of diagnostic coding in the adoption of EHR and practices that are billing Medicaid. After October 1, we are going to see many more requirements for diagnostic coding. So how can you prepare?
  • Find out if your practice management software will be ready for ICD-10 by October 1. This is critical if you have already been including diagnostic codes on your claims because the insurance providers will start denying claims without ICD-10 after October 1. I reached out to the Dentrix product manager and Dentrix G6.1 will be ready for ICD-10 … but you will still be responsible for adding the codes into the system.
  • Make sure you are using the ADA 2012 claim form because it has been upgraded to accommodate diagnostic coding. Within Dentrix, you can use the DX2012 or the DX2012F claim form to add diagnostic codes. Email me directly at dayna@raedentalmanagement.comif you would like an instructional PDF from the ADA on how to fill out the claim form.
  • Check your state Medicaid requirements to find out what diagnostic codes will be required. If you are already billing Medicaid, you are already familiar with the ICD-9 coding and hopefully you have already been informed about the looming October 1 deadline. Email me directly if you need more information about Medicaid requirements.
  • Start asking the insurance payers if they will pay for additional services if you are submitting the proper diagnosis codes. Many dental plans are now paying for additional preventative cleanings because of the direct relationship between periodontal disease and diabetes and heart disease.

As I get more information about his topic, I will keep you informed as much as possible. However, you can do your own research by clicking on the links below. Also, email me if you would like any of the information I discussed in this blog.

CLICK HERE for ICD and CDT Coding Examples, you must be an ADA member to use this service.

CLICK HEREfor free reference tools on the ICD-10 codes

CLICK HERE for the definition and final release from the CDC


Are you an organizational freak?

$
0
0

I am an organization freak. If you walk into my closet, you will find my clothes arranged not only by style but also by color. Everything has a place. The same thing applies for organizing your patient’s chart. I go into offices that use color-coded forms in their paper chart or stickers to designate certain things.

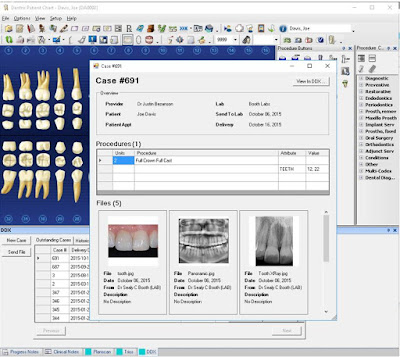
When you are organizing your patient chart in Dentrix, you can organize certain things to make it work better for you and more efficient for your team. If you are using the clinical note templates, you will notice that there are about 17 categories listed. What I find in every office I work with is that they probably use about six of those categories. For example, a general dentist might have templates in Hygiene, Restorative, Fixed Prosthetics, Periodontics, and Endodontics, where as a pediatric dentist might only use Hygiene, Exams, and Restorative.

My point is that when you have 17 categories listed and you are only using four to six of them get rid of the ones you are not using. You have the flexibility here to combine, eliminate, and add your own categories. Make the list work for you.

First, go in and delete any clinical note templates you will never use then delete the category. For example, if you are a periodontist then delete the endo templates and the endo category. Next, rearrange the categories so that the most frequently used categories are on the top. Finally, create categories that are not listed but you would use in your office. I have worked with some offices where we have created categories for Products, TMJ, Sleep Apnea, etc. If your practice has multiple doctors, you can create categories specific for their templates. For example, Dr. John’s templates, Dr. Joe’s templates, Susie’s templates, etc.

Keeping things organized helps your team become more efficient and productive. Take advantage of all the customization that your Dentrix software has to offer and you will become a super-user.

Check out other blog posts on the topic of customization and efficiency in your patient chart:

It's time to replace your paper Rolodex

$
0
0

Do you remember when you had that big Rolodex sitting on your desk? With this vital office supply, you could easily find the number to the local Walgreens pharmacy to phone in a prescription for a patient or locate the janitor’s number to let him know the office would be closed on Monday for a holiday? Oh, you still have one on your desk? How is that working out for you? Did one of your team members “borrow” one of the cards and accidently re-file it back in the wrong order?

What if Dentrix G6 could organize your Rolodex for you so you never lost anything and your entire team could have access to it? That would be pretty awesome, right? Also, what if Dentrix G6 could pull all your labs, referring sources, employers, insurance carriers, and providers/staff into an electronic Rolodex for you so you could organize them by color and filter them by category? Would that just blow your mind? Let’s just step it up one more notch and let you add your own categories like pharmacies, contractors, family members, etc., so you can keep all your contacts right at your fingertips.

Let me introduce you to eDex. eDex has been launched in Dentrix G6 and is one of my favorite new features. eDex will completely replace that paper Rolodex sitting on your desk and your entire team will have access to it because it is inside your Dentrix software. Now you have room for that dual monitor you have been asking for J.

Two options to help you manage your accounts receivable

$
0
0

I recently created an online course called “Show me the Money,” which ties in perfectly to today’s article. As you may have figured out, my online course is all about accounts receivable. Managing your accounts receivable takes into account many factors, including the new patient phone call, treatment planning, follow up, and collection letters. One thing you can do to manage your accounts receivable is to create the appropriate payment plan when needed. There are two different types of payment plans in Dentrix that can help you with the management of your accounts receivable.

The Payment Agreement is one type of payment plan in Dentrix. Use this if patients have already completed their treatment and have an existing balance you want to extend for a period of time. Entering in the payment agreements into Dentrix will help you manage your accounts in three huge ways.

  1. If you have read my articles about patient collections, you know that I use the Collection Manager Report for managing accounts receivable. This report allows you to enter columns of information that will show you Payment Agreement Balance, Payment Agreement Amount Due, and # of missed payments. Having this information at your fingertips can be extremely helpful on this report because you don’t have to do any research about the account balance. You can see that the patient is on a payment plan and if he or she is current with payments. Read More . . . on the Collection Manager Report.
  2. When you create a Payment Agreement, it will light up the Payment Agreement Summary section on the Ledger so anyone who opens the ledger will see that the account is on a payment plan as well as the status of the payments. If there are missed payments, this will show up in red in the Past Due section. This will be extremely helpful if the financial coordinator is on vacation and relying on other team members to collect money at the time of service or field phone calls.
  3. When you send billing statements, if you have entered in the Payment Agreement, it will accurately reflect the amount due from the family. The billing statement will show the total account balance and, in the PLEASE PAY THIS AMOUNT box, it will show the agreed payment amount. Also, if the patient has missed a payment, the billing statement will show a past due amount at the top of the statement to draw attention to this missed payment. If you are not using this feature, you might be writing on the statement … and that takes more time out of your schedule.

The second option for setting up a payment plan is using the Future Due Payment Plan feature. Use this when the patient is going to incur charges over a period of time in the future, such as orthodontic treatment. The Future Due Payment Plan helps you manage your accounts receivable in three ways as well.
  1. In a similar manner as discussed above, you can filter your Collection Manager Report to search for patients with a FDPP so you can focus on those accounts and see if any of these accounts have missed a payment.
  2. When you create a FDPP, it will remove the balance out of your accounts receivable and bill it out at increments you decide on. For example, if a patient is going to schedule a $5,000 12-month ortho treatment and put $1,500 down, then you can set up the payment plan to “hide” the $3,500 and bill out $291.66 each month automatically. Additionally, you can set it up so it will automatically create an insurance claim to go out to the insurance company as well.
  3. Finally, you can print out a coupon book if the patient would like a reminder for their payments.

If you would like more information on my online course titled “Show me the Money” . . . CLICK HERE.

Unused insurance benefits . . . it's now more than a once a year project

$
0
0

Since I have been writing the Dentrix Office Manager blog, I have posted up an article about this time of year reminding you to reach out to patients who have unscheduled treatment withremaining insurance benefits. This year is no different. However, I think that it might be a project you might want to tackle a couple of times each year depending on when the big employer groups start their benefit year. When I was working in my practice in Washington state, we had several groups that renewed at other times than January. Boeing, for example, renews in July and the school districts renew in October. 

If you decide to generate this lists of patients, you can filter the list by benefit renewal month. To generate the report, go to the Appointment Book > Treatment Manager > select the filters you want, including the benefit renewal month.


Since I have written on this topic every year, I am going to point you back to the articles so you don’t have to do a search.

               CLICKHERE to read “Don’t let unused insurance benefits go to waste.”

               CLICKHERE to read “Unscheduled treatment . . . the urgency is now.”

               CLICKHERE to read “Send letters that make an impact”

Top 5 things to bring the miracle of technology to life

$
0
0

During my 22 years in dentistry, I have been both the trainer and the trainee when it comes to implementing new technology in the dental practice. People who know me see me as kind of a computer geek.

The satisfaction of getting a new computer, network or piece of technology to work was the thrill of the hunt. It’s amazing sometimes that it all works together.

The miracle that all the technology works together is actually not a miracle at all—it takes planning and professional help. It doesn’t just happen. There are five critical things to consider when purchasing a new piece of technology, whether it is for the clinical or business side of your practice. These five things will not only help bring this miracle to life but also make sure your team is as efficient as it can be:
CLICK HEREto continue reading my full article on DPR

Why do I need encrypted email?

$
0
0

Let’s picture a postcard. This mode of communication is perfect for documenting your latest trip laden with landmark pictures on the front and a simple “Wish you were here” written on the back. Anyone can flip over the postcard, read your sentiments. You’d never write anything too personal knowing this postcard can be an open book. No need to safeguard this innocent letter.

Now imagine if it has your social security number written on the back under your name. Not so innocent anymore! This is exactly what an email is. A regular email is open for anyone to view while in transit to its recipient. Now imagine a letter, duct taped and carried by an armored van to the recipient. This is an encrypted email.

As a Covered Entity, you are responsible, by HIPAA law, for safeguarding your patient’s data.

Anytime electronic Protected Health Information (ePHI) is being sent in an email, HIPAA recommendsimplementing procedures to ensure secure transmission and storage. The easiest way to do this is to utilize an encrypted email system.

Ideally, look for a provider that offers the option to send regular vs. encrypted mail. For example with Aspida Mail  it is triggered by a keyword, encrypt in the subject or body of an email. If that keyword is omitted, all emails flow as usual.

Additionally, if you are receiving ePHI to your email, verify you are implementing secure storage procedures. Typically, (free) Gmail, Aol & Yahoo Mail do not store securely.

Additional Tips:
  • Opening Emails
    • Use a mail solution that has antivirus and a robust spam filter enabled.
    • Inspect all email messages thoroughly, including the senders address.
    • Do not open any email that looks suspicious. If you do not know the sender, treat it as suspicious email.
  • Sending Emails
    • Confirm the email address with which you are sending information. 
    • Do not put any ePHI in the subject line of an encrypted email – this information is still transmitted through an unsecure environment.

By familiarizing yourself and your team about these email procedures, you’ve taken the first steps to protection. The next step would be to figure out what works best for your practice and come up with a plan for implementation. And don’t forget, documentation of all policies and procedures is key!
 
CLICK HERE for more info on Aspida email solutions

About the Author:
Laura Miller is Compliance Manager of Aspida, has quickly established itself as an industry leader in providing compliance security products and services for healthcare providers.

Thank you for scheduling with our office

$
0
0

One thing I would be asked after scheduling a patient for an appointment on a daily basis was, “Can you email that to me?” My answer always was, “Sure, I will do it right now.” Then I would open up my Microsoft Outlook and manually send the patient an email at his or her request. It was a time-consuming task, but my patients were happy. If we could somehow automate this task, we would have happy patients and happy teams, right? 


Well . . . Dentrix eCentral has made this a reality! When you schedule a new patient or an existing patient, the eCentral Communication will send out automated correspondence with all their appointment details. You have the option of sending out a customized email, text message, or postcard.  Since you have the option of customizing the email to make it personal for your practice, why not include a link where your new patients can click to be directed to the new patient forms?

These new features sends the Dentrix eCentral Communication manager into overdrive. It makes me excited to see all the new features making a huge impact on the daily lives of the front office team’s efficiency and giving our patients the tools they need to manage their appointments.
CLICK HERE for more information on these exciting new features.

Join Dayna's Wall of Fame

$
0
0
Three months left in 2015,  this is your year to become the best you can be in your career.  Show off your skills and brag about your accomplishments. 

Challenge yourself to become a Dentrix master.  Join me on the Wall of Fame as I post up your accomplishments on my blog all throughout 2015.   CLICK HEREto start your success.

Watch my video to hear all the details . . .


 Wall of Fame


CONGRATULATIONS!
You are a Dentrix Master


Remind and Confirm the entire family with one message

$
0
0

Do you have a practice where you have several patients from the same family come in together on the same day for their dental visits? If so, this blog post is for you.
I am a huge fan of automation in your continuing care and appointment reminder system.
Automating these systems not only helps your front office team be more efficient, but also helps make sure patients don’t fall through the cracks. We not only want these systems efficient for the dental team, but also for the patients. This is why eCentral has added . . . . drum roll please!!!
Family Reminders
The new family reminders are available for email, text, and postcards so your practice can choose which method you want to setup. The email and postcard will show all family members and the start time of each appointment where the text message will show all family members and the earliest start time. When the appointment reminder is replied with a confirmation, it will confirm for every family member with one reply.
Update your software now to take advantages of these amazing eCentral features and stop the confusion of multiple appointment reminders. If you want these features in your office, call the Dentrix sales department today at 800-336-8749.


What if your lab cases were linked to the patient chart . . . would you be interested?

$
0
0

There is so much more that goes into going paperless than eliminating your paper chart. Since launching my Path to Paperless coaching and presentation, I have watched the digital landscape evolve significantly. With the addition of the HIPAA Security Rule in 2005, dramatic changes had to occur in order for the dental practice to become compliant with the exchange of electronically protected health information. To this day, many dental practices are still not compliant with the HIPAA Security Rule.

One of the most challenging information exchanges is in the form of images and digital impressions to your lab. My goals is to find solutions that are have a user-friendly interface for the team, seamless integration into your practice management software, and a low-cost price tagfor the office. I found that with DDX. This web-based software solution has it all.

When I found out that DDX is woven right in to the Dentrix Patient Chart, Document Center, and Lab Case Manager, I knew I had to get the word out. Here are some of the ways DDX and Dentrix talk to each other.
  • You will get a new tab at the bottom of your Dentrix Chart, along with the Progress Notes and Clinical Notes tabs. This gives you and your team easy access to your digital lab files.
  • When you create a lab case, DDX automatically creates a clinical note in the patient’s chart, avoiding any missed documentation.
  • DDX is fully integrated with the Dentrix Lab Case Manager for better case management and scheduling.
  • All lab case summaries are automatically entered into the Document Center as a PDF file. This makes it easily accessible for review or transferring to another provider.

If you are using Dentrix G5 or higher, you have probably seen the DDX icon on your tool bar and wondered what it does. If this is a solution you or your doctors are looking for in your practice, CLICK HERE to learn more.
Viewing all 313 articles
Browse latest View live